Microsoft Excel Mastery: 7 Features for Excellence
For decades, Microsoft Excel has been adding amazing features to its software. And for decades, many of these features have been overlooked. It’s time we changed that.
Welcome to the third post in our Microsoft Mastery series! (if you missed the first two – Microsoft Mastery: A Look at Outlook, and Microsoft Word Mastery: A Word About It – be sure to check them out). This time, we’re breaking down some of the best Excel has to offer, from the powerhouse that is Power Query to game-changers like PivotTables.
Let’s get started.
Organize Like a Pro
1. Duplicate Your Worksheets
For when you need to copy your worksheet, without having to rewrite it simply:
- Press Ctrl, then drag a sheet tab to the right to create a duplicate. This also works with multiple selected sheets.
2. Bookmark with Name Box
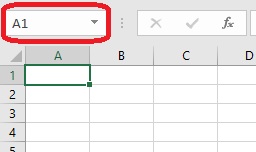
If you’ve ever wanted a quick way to bookmark cells within your Excel sheet, then you ought to check out the Name Box feature – the box in the top-left of your screen that lists the current cell you have selected. We can use this tool to bookmark important spots in our Excel sheet. To do this:
-
- Select a cell that contains important information (The total price of a financial dataset.)
- Click the Name Box.
- Type in a name for your bookmark (e.g. Final Price) and press Enter.
- Use your bookmark by clicking the down arrowhead next to the Name Box.
- Click your created name and you will be brought right to the cell.
- You can manage your names by selecting Name Manager under Formulas.
3. Paint Any Format
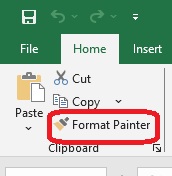
Ever spend all day perfecting a spreadsheet – tweaking borders, fonts, colors, and everything else – only to be told to make another one just as nice? Instead of starting from scratch, we’ve got a shortcut for you: Format Painter.
This tool lets you copy formatting from one cell (or group of cells) and “paint” the same formatting somewhere else. It’s like “copy and paste,” but for formatting. Here’s how it works:
-
- Click the cell whose format you want to copy.
- Click the Format Painter icon in the Home tab – the cursor will turn to a + sign with a paintbrush.
- Click the cell(s) where you want the formatting applied – it’s that easy!
Super Smart Data Entry
4. Turn Pictures into Data
Let’s say you have a picture of a spreadsheet, but not an actual file, and need to enter the data into a new sheet. Instead of tediously typing everything out, Excel can extract the data directly from the picture. Here’s how:
-
- Go to Data > Data from Picture (or from Clipboard if it is a screenshot).
- Excel will analyze the image and convert the information into an editable dataset.
It’s not magic, but it kind of feels like it!
5. Save Time with Power Query (Get & Transform)
Excel is used by billions worldwide, but only about 2.2 Million users are estimated to use Power Query – just 2.8% of its potential audience. Many think Power Query is only for advanced users, but in reality, anyone who works with data can benefit from it.
For those who aren’t familiar, Power Query allows you to easily import, clean, reshape, and combine data from various sources. It removes tedious tasks, making data preparation faster and easier.
Here’s how to use it:
- Open Power Query
- Click on the Data tab.
- Look for the Get & Transform section – this is where Power Query lives.
- Import your data
- Click Get Data and choose where your data is coming from (Excel file, CSV, database, or even a website).
- Select your file, then click Load (or Transform Data if you want to clean it before loading).
- Clean and organize your data
- Once your data is loaded, click on Query Tools at the top.
- Remove Duplicate Rows: If your data has duplicate entries, select the column where duplicates are and click Remove Duplicates at the top.
- Filter & Sort: Click the dropdown arrow on any column and select your filter sorting option.
- Combine data from multiple sources
- Stack tables together: Click Append Queries, select the table and click OK.
- Merge data by matching columns: Click Merge Queries, select tables, choose matching columns, then click OK.
There is a lot Power Query can do, and this is just a small glimpse to get you started. We encourage you to play around with the tool to see what works best for your data – just be sure to save backups along the way to avoid losing your progress!
Next-Level Analyzing
6. Summarize Any Data with PivotTables
Like the feature we just covered, PivotTables has a lot going on. In fact, entire books have been dedicated to the topic. While we won’t go that deep, they are incredibly helpful for summarizing and analyzing large datasets.
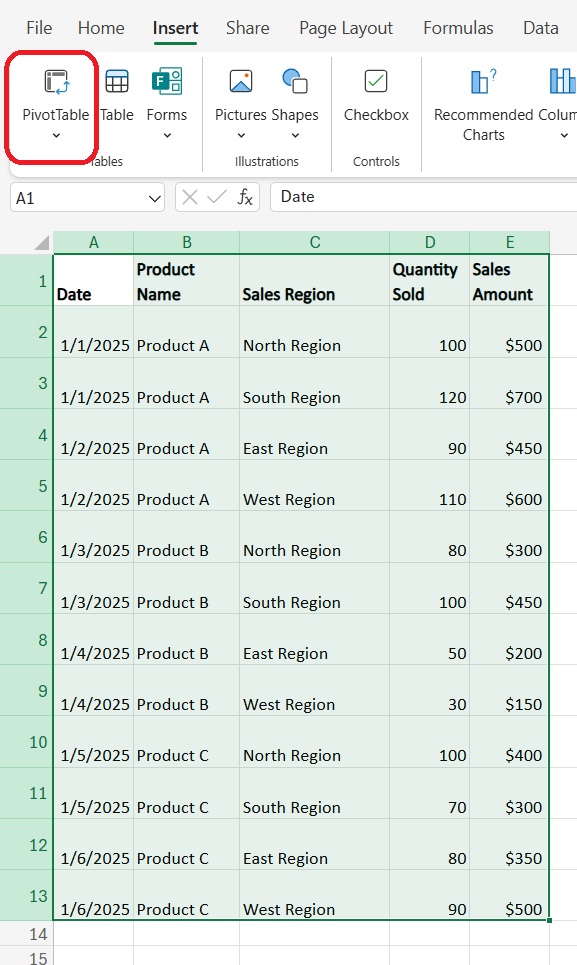
Imagine you have a sales dataset with the following columns: Date, Product Name, Sales Region, Quantity Sold, and Sales Amount. You want to analyze how much revenue each product is generating, grouped by region. Here’s how you do it:
-
- Select your data
- Highlight your entire dataset, including the column headers.
- Insert a PivotTable:
- Under the Insert tab, click PivotTable. (Excel also offers Recommended PivotTables for quick suggestions)
- Confirm the data range and choose where to place the PivotTable (choose New Worksheet or Existing Worksheet)
- Select your data
-
- Set up your Pivot Table:
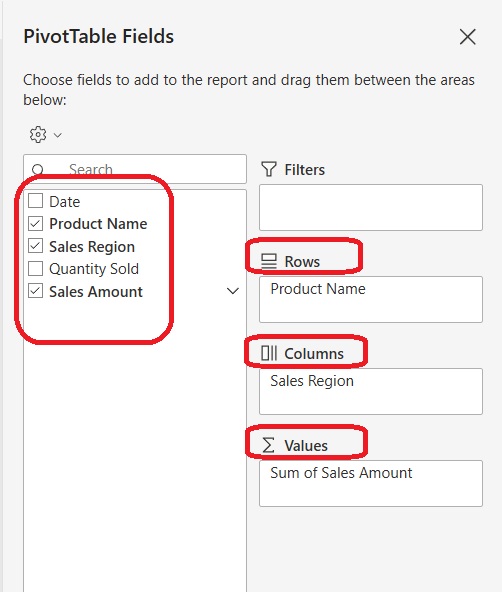
- In the right panel, drag Product Name to the Rows field to list each product.
- Drag Sales Region to the Columns field to group the data by region.
- Drag Sales Amount to the Values field, which will automatically sum up the total sales for each product in each region.
- Set up your Pivot Table:
- View your results:
- Your PivotTable will now show the total sales for each product, split by region.
Eample:
AI Analysis
Now, what if we told you there was a way to use AI to help set up your PivotTables? Introducing: Analyze Data.
Let’s say you have a dataset like the one we used for our previous example. Here’s how you can use Analyze Data to boost your analysis:
- Click Analyze Data under the Data tab.
- Inside the Analyze Data panel you can ask Excel any question you might have about your data, or follow the suggested questions. It will then offer you various pivot charts to insert right into your worksheet.
- You choose what fields you would like analyzed by clicking “What fields interest you the most?”
And with that, you’ll be making pivot charts faster and easier than ever!
7. Predict the Future with Forecast Sheets
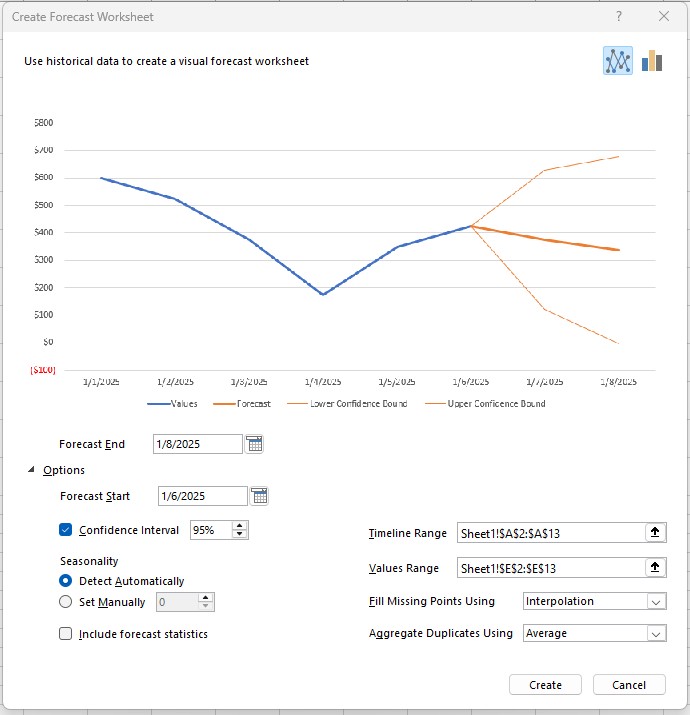
Introduced in 2016, the Forecast Sheet tool is a must-use feature, especially for working with sales or revenue data. As the name suggests, Forecast Sheets predicts future trends based on the data you provide. You can probably see how great this tool can be.
To use the Forecast Sheet tool:
-
- Choose the range of cells containing the dates and values you want to forecast (for example, dates and historical sales data)
- Under Data, click the Forecast Sheet button.
- A forecast based on historical patterns and behavior will be displayed in a line graph, showing projected trends.
- You can adjust settings such as the forecast period’s end date, confidence level, seasonality, and how to handle duplicate data.
Excel-lent Job
There is no denying just how useful Excel is – especially with the right tools at your disposal. Taking the time to learn and practice makes a world of difference. But this is just the beginning – Excel has even more to offer.
Use this post as your opportunity to explore even deeper.
If you have any questions or want some more direction, that’s why we’re here. Our team of experts is waiting and ready to help with any of your 365 needs. Just give us a holler.
About The 20 MSP
As a leading provider of managed IT services, The 20 MSP serves thousands of businesses nationwide, providing each one with white-glove service, secure and streamlined IT infrastructure, and 24/7/365 support. We believe in building lasting relationships with clients founded on trust, communication, and the delivery of high-value services for a fair and predictable price. Our clients’ success is our success, and we are committed to helping each and every organization we serve leverage technology to secure a competitive advantage and achieve new growth. To learn more, visit the20msp.com.

