Microsoft Word Mastery: A Word About It
Microsoft Word – humble yet mighty. For over 43 years, it’s been the trusted word processor for millions, and it’s still going strong. Fun fact: we crafted this blog in Word!
While Word may feel like an old friend, it’s packed with features that often fly under the radar. From templates to AutoText, and even built-in translations, Word has far more tools than you probably realize.
That’s why we have Microsoft Mastery – your go-to guide for getting the most out of Microsoft’s everyday tools.
This post is the second in the series (if you missed A Look at Outlook, check it out here). In this installment, we’re grouping Word’s features into beginner, intermediate, and advanced levels.
Let’s get started.
Beginner: Getting Started with Word
These beginner tips are perfect for exploring the goodies hiding just below Word’s surface, and only take a few clicks to get going.
Templates: Say Goodbye to the Blank Page
Have you ever felt daunted by the dreaded blank page? Templates are here to save the day. These handy design tools provide pre-made layouts for everything from calendars to schedules to brochures. Best of all, you can even create and save your own custom templates for future use.
Using Built-in Templates:
- Open Word, and at the top, select More Templates.
- Search for the type of template you would like to use.
- Click the template and select Create.
- Start filling out your template!
Creating Custom Templates
- Save a file as a template: File > Save As.
- Choose Word Template as the file type and save it.
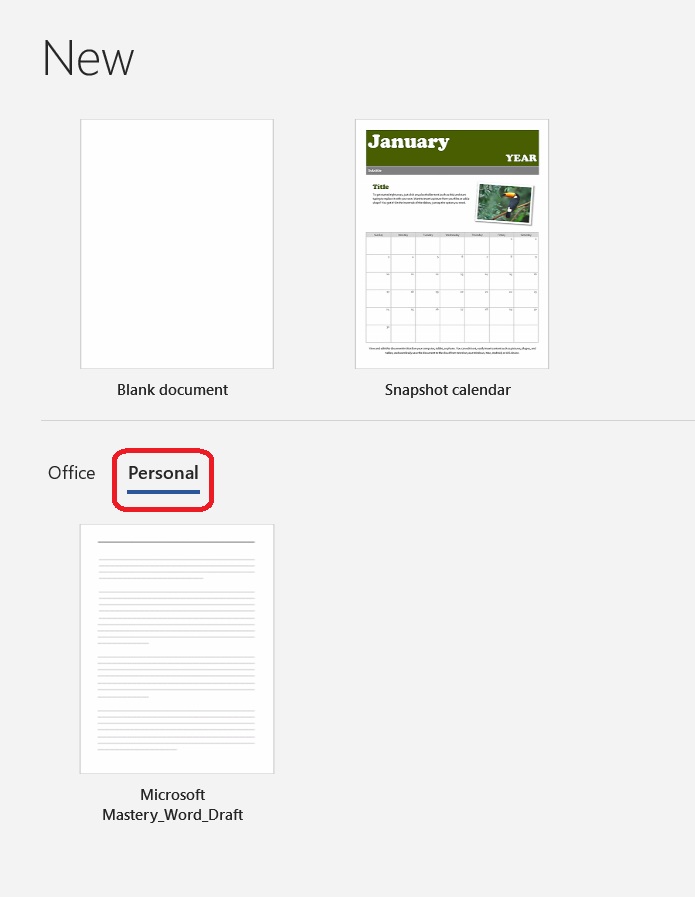
- Access your custom templates later via File > New > Personal.
For a full range of templates, visit the Microsoft Word Template Gallery.
Generate Filler Text Instantly
Sometimes, you need to fill a document with placeholder text – whether for demonstration purposes or to test formatting. Luckily, Word has a simple feature called field codes that makes generating filler text a breeze.
-
- Select the area you’d like to add text.
- Type the following command and hit Enter:
- =rand(#paragraphs, #sentences)
Example: =rand(3, 5) generates 3 paragraphs of 5 sentences each.
And voilà – Word generates filler text instantly!
There is a lot more you can do than with field codes, so check out Microsoft’s website here.
Pasting Without the Headaches
Ever pasted text into Word, only to find the formatting out of whack? Suddenly, you’re stuck adjusting the font, color, and spacing just to make it look right. But there’s a quick and easy way to avoid this hassle.
- Copy the text you would like to paste.
- Place your cursor where you want the text to go.
- Press Ctrl + Shift + V (Windows) or Command + Shift + V (Mac).
- The pasted text will follow the formatting you have already set up in your Word document, no adjustments required!
Automatic Date & Time Updates
Reusing a document or template that involves a date? Instead of manually updating the date each time, let Word handle it for you!
- Go to the Insert tab.
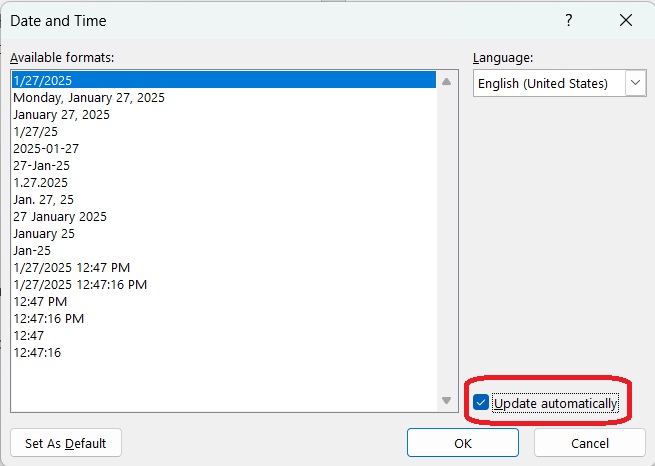
- Select Date & Time and select your preferred date format from the list.
- Check the Update Automatically box before inserting.
- Click OK to insert the date.
Now the current date will automatically appear whenever you open or print your document!
Recover Unsaved Files
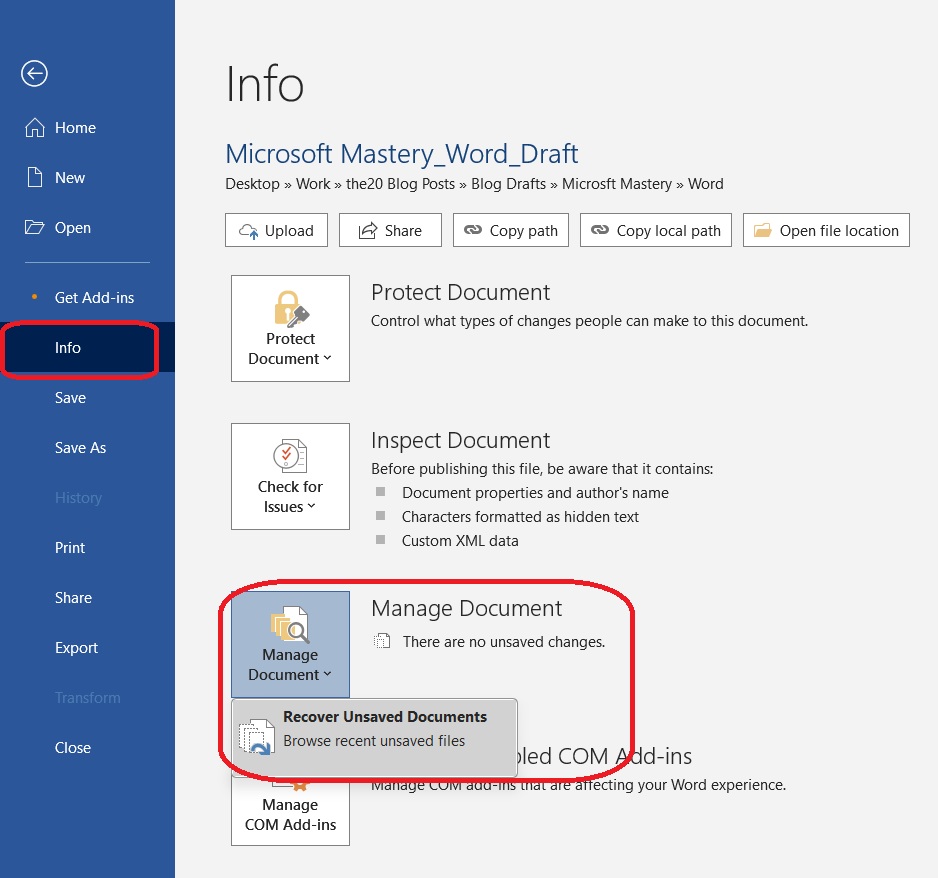
We’ve all been there – Word crashes and your document seems lost forever. Fortunately, Word’s built-in recovery tools can often save the day. If the automatic recovery panel doesn’t appear when you reopen Word, don’t panic! Here’s how you can manually recover unsaved files:
- Go to File > Info > Manage Document > Recover Unsaved Document.
- Browse through the list and locate your file.
- Open the file, review it, and save it immediately to prevent further loss.
Pro Tip: Regularly saving your work can help you avoid these headaches in the future.
Intermediate: Taking It Up a Notch
These tips are a bit more involved, but if you follow along, you’ll be able to make some serious strides in organizing your documents. From outlines to automatic table of contents, Word continues to deliver.
Creating a Table of Contents
If you’ve created a lengthy document and need a way to help readers navigate, a table of contents is for you.
Note: You will need to use Word’s “headers” for this to work correctly.
- Highlight your headings and subheadings and select the corresponding header (e.g., Heading 1, Heading 2) under the Home tab.
- Go to References > Table of Contents and choose an automatic style.
- If you make changes to your document, you can update the table by clicking the table of contents and selecting Update Table.
Built-In Translation
If you’ve ever needed to translate and found yourself cutting and pasting between your document and Google Translate (or another tool), you can stop right there. Word has built-in translation tools to simplify the process.
- Highlight the text you’d like to translate
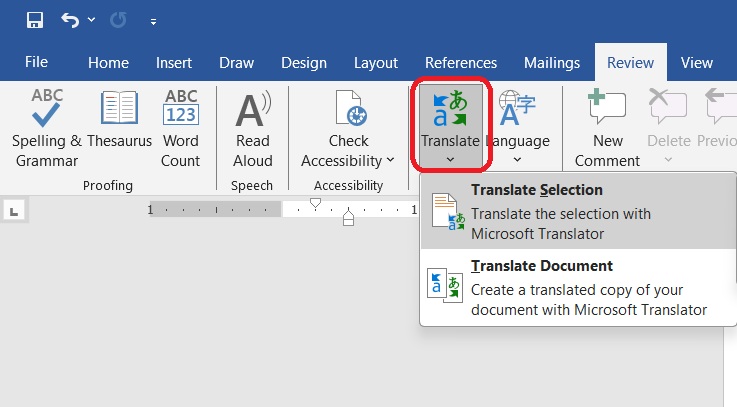
- Go to the Review tab, select Translate > Translate Selection or Entire document.
- In the translation panel, choose the target language from the options at the bottom.
- Click >Insert to paste the translated text into your Word document.
- ¡Buen trabajo!
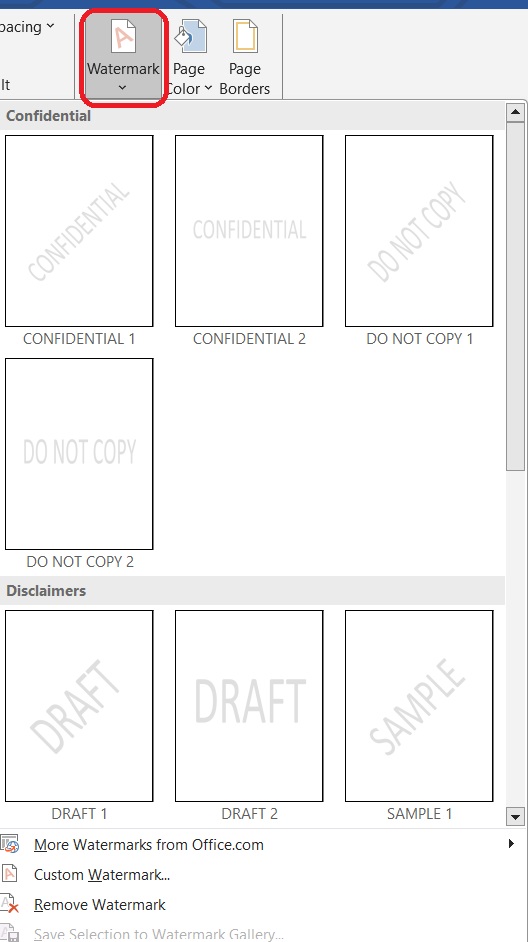
Adding a Watermark
If you create brand – or company-specific documentation, adding a watermark can help identify your work and emphasize its importance. Watermarks are useful for labeling documents as confidential, urgent, or part of your organization.
- Go to the Design tab and select Watermark from the Page Background group.
- Select a Watermark you would like to use: Confidently, Disclaimers, Urgent.
- To design your own, choose Custom Watermark and fill out the window with your desired information.
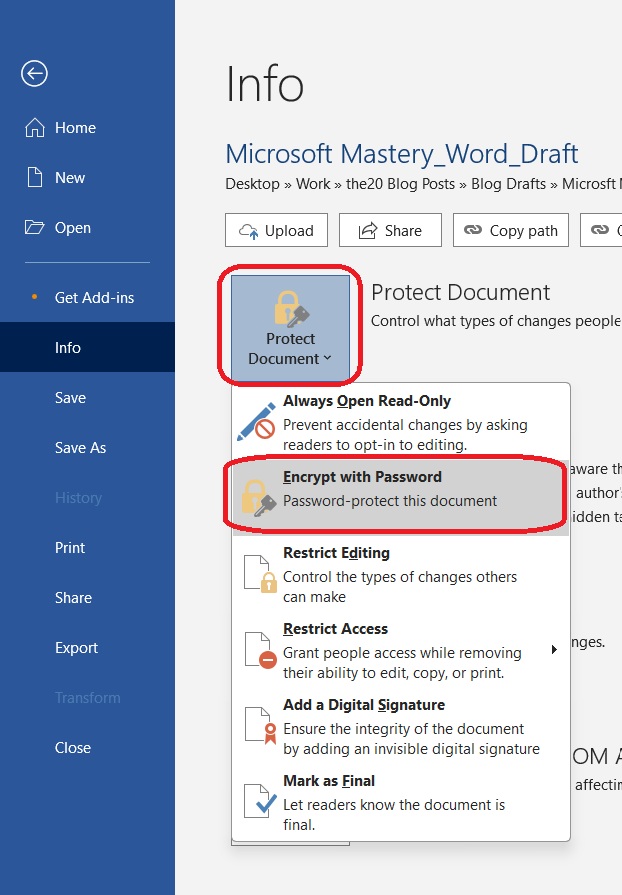
Password-Protect Your Documents
For an added layer of security, Word allows you to password-protect your most critical documents.
- Go to File > Info > Protect Document > Encrypt with Password.
- Type a password and press OK. Type it again and press OK to confirm it.
- Save the file to make sure the password takes effect.
Important Notes:
- Passwords are case-sensitive and can be a maximum of 15 characters long.
- Lost passwords cannot be recovered so store them securely!
For tips on creating strong passwords, check out our guide: What Makes a Good Password?
Advanced: Full Mastery
Ready to take your Word skills to the next level? The following tips are more advanced, but they’re still easy to learn and can make a huge difference to your workday.
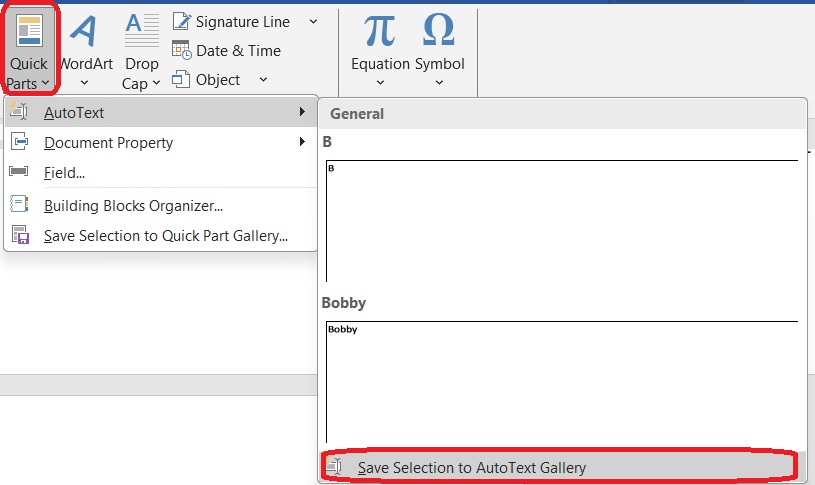
Save Time with Quick Parts (AutoText)
Have you noticed when you type certain words, Word suggests completing them automatically? For example, typing “Sund” gives you the option to complete it as “Sunday” by pressing Enter. This feature is called AutoText and is part of MS Word’s Quick Parts.
The best part? You can create your own AutoText entries to speed up repetitive documentation!
- Write the text you want to turn into an AutoText entry and highlight it.
- Go to the Insert tab, then select Quick Parts > AutoText > Save Selection to AutoText Gallery.
- Create a name and description and hit OK.
- To use your AutoText, type the first 4 characters of your AutoText name, and Word will suggest completing it. Press Enter to insert it instantly.
Organize with Outline View
We’ve all created messy, barely functional outlines. Well, Word has a built-in outline feature that lets you easily create an organized outline structure, allowing you to adjust your document with just a few clicks. You can use this when creating new outlines or when working with existing documents.
- Enable Outline view:
- Click on the View tab in the ribbon at the top of the screen.
- Select Outline from the available options.
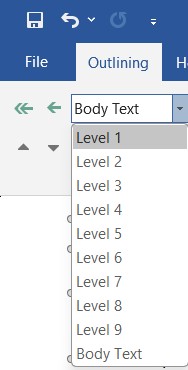
- Understand Levels:
- Word organizes content into levels, representing the hierarchy of your headings:
- Level 1: Main title or major sections.
- Level 2,3, etc.: Subheadings or smaller sections within each main section.
- Body text: where your main text will exist.
- You can assign text to different leaves by selecting the text and choosing the appropriate level from the level dropdown menu in the Outline view.
- Word organizes content into levels, representing the hierarchy of your headings:
- Rearrange Sections Easily:
- Each heading is displayed with a + or – symbol to expand or collapse its content.
- Use the + symbol to select and drag sections to rearrange your document without manually copying and pasting.
There is a lot to make use of in this feature, so we highly suggest you experiment with it and see what works best for you. With some practice, you’ll be making master-crafted outlines.
Transcribing Audio to Text
Need to turn an audio file into text? Word has a built-in feature for that too!
- Go to Home > Dictate > Transcribe.
- Select an audio file to upload, and Word will generate a transcript for you.
Important Note: Transcriptions may not be perfect, so be sure to review and correct any errors.
That’s the Word
With these tips, you’re well on your way to mastering Microsoft Word. While there are many more features to explore, this guide provides a solid foundation to build on – but remember, this is just the beginning.
If you’re looking for more tips or need assistance, don’t hesitate to reach out! Our goal is to demystify the jargon and help you make the most out of your tech.
About The 20 MSP
As a leading provider of managed IT services, The 20 MSP serves thousands of businesses nationwide, providing each one with white-glove service, secure and streamlined IT infrastructure, and 24/7/365 support. We believe in building lasting relationships with clients founded on trust, communication, and the delivery of high-value services for a fair and predictable price. Our clients’ success is our success, and we are committed to helping each and every organization we serve leverage technology to secure a competitive advantage and achieve new growth. To learn more, visit the20msp.com.
